Audi work
Role
Chief mechanic
RAIC Acrynm and theory
Redunt Array of Inexpensive Cars (I made this up, not really a thing). Like a hard drive based RAID, a few inexpensive cars is cheaper to run that one really expensive and nice car. Older well-made luxery cars are just better though :)
Story
My first project was buying a $450 1999 Audi A6 with 200K mile (Bilford). I happen upon (they find me) machines that need rehab and need life breathed back into them. The story is below.
Status Quo (Summer 2018)
Bilford is still kicking around in San Francisco 260K miles strong. It is mainly my surfing (Pacifica) and skiing (Tahoe) rig while hauling the Calvin. I daily another rescued machine (2007 A3) that gets far better mileage.
Bilford (the first)

Similar to many of my projects this C5 Audi A6 Avant, aptly named Bilford, was not planned. Moreover, this is another ‘rescued machine’ that may have been otherwise doomed to the junkyard – although I like to ring out every little bit of usefulness of something. This may get a little long.. and I am leaving out a significant amount, but Bilford has been a fun project and continues to evolve.
As I keep adding a list of modifications, since this is my testbed for C5 modifications. Thus, this is getting a bit long. So I opted for a quick TOC:
Backstory on Bilford
Running list of modifications/projects:
iPhone Integration
iPhone Integration, v2.0
Improve ignition system with modern coils
Heat seat retrofit
Belly pan/aerodynamics
Steering improvements
Better MPGs with better mist injectors
Building your own correct timing belt tools
Center Console Change tray addition (3D printing)
Sport Seats – brief on re-upholstering
Backstory on Bilford
At this juncture in time I sorted out all of the issues with the UrS4 and was happily driving that (in mainly inclement weather when bicycles were not a great option). I came across this Audi to help someone out.. the car had been sitting for approximately two years. The windows would not roll up, various electrical systems were completely on the fritz and, of course, the car would not start – let alone the 200,000+ miles on the engine and chassis. I thought if this was an analogous problem of the Audi C4 platform (lUrS4) and we could replace the ignition switch (since it touched all of those systems). After replacement there was no effect. He was tired and frustrated from having this car sit around so long – Bilford had been in 3 shops around town for 8 months of those 2 years of sitting and no mechanic could figure it out. So he asked me if I would take it out of there for $450 as that’s what he would receive from the junk yard – then I could try to figure it out on my own time. I begrudgingly agreed.. I can rarely pass on a challenge like this – although I was running out of space to work on all my projects.
I showed up in his apartment complex parking lot and began work to at least try drive it back to my house. Armed with spare winter set of wheels (tires were flat with age), a new battery, set of spark plugs and a new MAF. Replacing all of these systems in a tight parking spot was a pain.. and after all of this Bilford did not turn over. I plugged in my computer armed with VAG-COM and my OBD2 -> USB cable and read the codes logged on the ECU… there were at least 25 of varying severity. At this point I was a bit discouraged thinking the timing or something more catastrophic was wrong. For fun, I just cleared all the codes then tried to just reset everything including the throttle body valve adjustment. It error’ed out. Check the codes again and a massive list reappears and will not attempt to realign the throttle valve without clearing them. So I have an idea.. if I open two instances of VAG-COM and clear the codes continuously before it has time to cancel the throttle valve alignment.. it could work? Well wouldn’t you have known it.. it completed successfully! And the list of error codes subsided.. Then I gave the ignition a shot.. and Bilford fired up! Albeit very rough.. may be enough to get me home and shake out some running issues. As well as replace that old gas. It dies a few times but made it to my driveway just fine.
The day it arrived to my driveway: You can see the duct-tape reminisce around the windows. It took a better part of the month to clean it all up:

Since that fateful day I have gone through all of the wiring. I had to strip the interior and trace the wiring all around the car.. although when I pulled the already wet carpets I found 2 inches of standing water. Electrical systems hate water. I ripped off the duct-taped on plastic over the windows and let it dry out after removing the water. I picked up a factory manual from my local library (interlibrary loan) and traced every damn wire. Most of the crimped connections just fell apart in my hands with green oxidation. After soldering and thoroughly sealing every connection, all electrical systems seemed to work much better.
I have been making improvements on the car since restoring it back to a road-worthy state. Although not trying to invest a lot of money. First and foremost was the water induction issue.. with a friend and a hose I found the windshield was not sealed. A little silicone and no more water! Then I replaced all O2 sensors and serviceable filters (fuel, air, cabin, etc) as I wanted peak efficiency and emissions to try not to make too large of an impact with pollution. To that effect, the smell of burning oil on the engine was horrible – so I replaced every vacuum hose and secondary air injection hose (they were extremely broken and brittle plastic) to pull the crankcase gases away from the engine. After this I replaced all camshaft/crankshaft seals that had been leaking from the lack of maintenance over the years. As well the cam cover gaskets and seals (spark plugs wells filled with oil). After these improvements the engine sounded (and smelled) much healthier! The engine still looked quite fresh on the inside as well:


The Avant-ness of Bilford has been very handy, I dare say it is more useful than a truck. I have hauled at one time: a canoe, 3 bikes, a dog and 5 people. Albeit a little cramped, it was more than adequate to bring us to the campsite. I have hauled couches, tables, and many dogs (has a built in dog gate).

And over 2000 pounds of stone for a fire pit in the backyard:

Some additional modifications (although always in a state of flux and adding systems) that I have created on my own and other could add to their Audi’s:
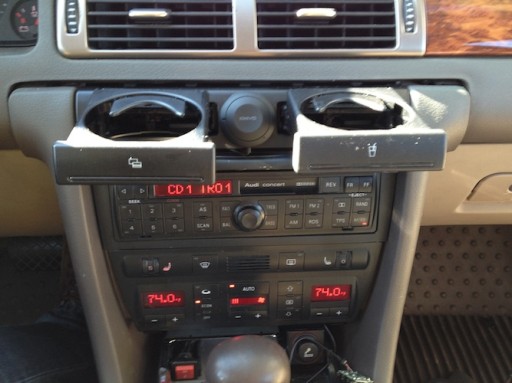
Homemade iPhone dock system
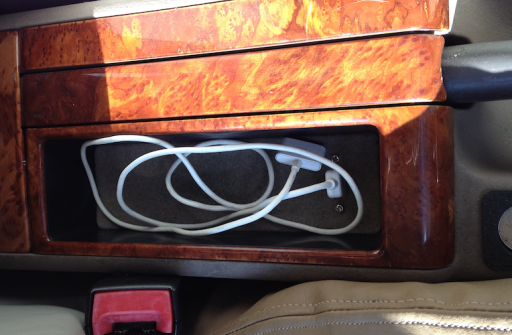
Many companies want $200+ for an aftermarket iPhone/iPod system to attach to the stock Audi radio. And they do not even look nice. Also, in the process they take out your CD Changer function. And don’t get me started on those awful looking after-market stereos. I wanted best of both worlds so I thought to develop my own iPhone integration system to the stock deck. The idea is simple: I simply tap into the CD Changer audio signal (clear full-range sound) – but hijack it before it enters the stereo and send the iPod audio in its place. Add in a DPDT switch (for R and L audio + ground) so I can manually switch the inputs to what I desire. A little bit of soldering later and I have a fancy new iPod dock installed in the previously worthless “credit card” holder:

Minucia:
I have 3D printed a black cover to assist guide-in inserting an iPhone in the dark (and looks a little nicer than a bare metal dock.)
Also the deck is hard-coded to mute while changing discs (annoying while listening to an alternative audio source). I started working with the code to change this – but went with the KISS method and just have one disc in there at a time.
I also noticed a slight hum, so I picked up a ground loop isolator in the process and wired it inline. Once grounded, the sound is crystal clear! I also do not have to hide my phone away in case a call comes in, or to quickly check a map (all while charging).
Homemade iPhone dock system – Version 2.0
The aforementioned iPhone docking system was a great success – and really utilized the unused aspects of the C5 interior that were previously null. But sometimes I would take quick trips, etc. where pulling the phone out of my pocket and placing it in the cradle was a hassle (hey, this is ‘merica). Also, Bluetooth will future-proof me a bit if I upgrade to something else (cradle will only fit iPhone 1-4). Bluetooth has really come a long way – and there are inexpensive aftermarket solutions that can take full advantage of this streaming wireless tech. My expectations were:
- – Auto-connect (more difficult to find than I thought)
- – battery-less (to toggle with 12v)
- – A2DP
- – Quality Microphone
- – Integrate with car easily
- – Inexpensive (since I may modify it, and break it)
- – not look ostentatious
I found many of these aspects are common.. but all together: near impossible. Many BT products are battery powered, and would stay on when the car was turned off – thus had to be toggled with a switch/button every-time (no thanks.. might as well keep the cradle). Then I found something that has promise: The Kinivo BTC450 – having auto-connect, A2DP and cheap (I picked it up for $25). Thus I did not feel bad cutting wires and doing a bit of soldering. Since this did not have a battery (perfect), I wanted to hard-wire it to my A6’s switched (to the key) 12v system, so it would power on when I turned on the car’s acc position (and turn off when I switch it off – so it would break the BT connection). I already had the audio ready to rock from iPhone integration v1.0 – so it was a matter of wire-routing, mounting, and minimal soldering (I did not want wires going everywhere in plain site):
Very easy install. Now I every-time I turn the key, the phone auto connects and plays right where I left off – on Spotify, Music playlist, or some sweet podcast I was listening to. Sound even better than the cradle system as well! Welcome to 2013.
Also, I routed new power since there was no cradle anymore (I put another cup holder in) – to those interested:
Improve ignition system with modern coils
Since I have accomplished this on my UrS4, it was not a new idea. But I was surfing the VW parts outlet and saw a super sale on the O6E coils. $5 ($3.44 for my pricing) and I thought I could stock up. The waste spark design for the 2.8 is reliable as all hell – but if something were to go it would be expensive. With 250K on the clock, it seemed a matter of time really. When replacing parts I can not simple replace and pay full price – that is not me – it is a great time to improve! So I started looking at the wiring diagrams:
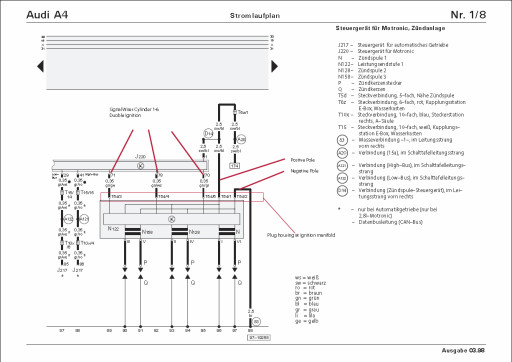
Similar to the UrS4 since there is always ‘+’ power available – then chooses to ground ‘-‘ on firing order. Simple stuff. Now just have to send the right signals to the new coils.
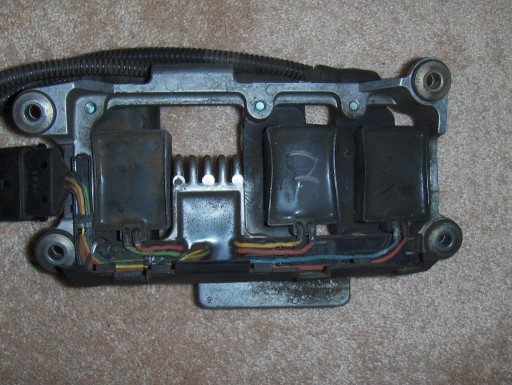
The waste spark coils have the wiring all layed out as well:
They physically fit (trimming the rubber insulator – same as the Urs):
Altogether I hope to get improved MPG, low end torque and ease of diagnosing (i.e. misfire on #4, replace #4 coil – pull, unplug old one, plug in new one – done.)
Stock heated seat
This was originally a Florida car and did not have the winter package, so no heated seats. Moreover, the drivers side seat was in sad shape. A trip down to the junkyard and I pulled a nice driver-side leather heated memory seat from a car for < $100 along with the wiring couplings and potentiometer switch. Although I had to figure out the wiring myself, it was trivial to what I have been through already with fixing the mess of corroded wires when I received Bilford. Just like any potentiometer you need positive (with extra fuse!!!) and ground. On this instance you also need to send the heater a signal to shut off when it sufficiently hot (switch negotiates that). And also a signal when you turn the lights on, and another when the ignition is on (so it does not stay hot all the time!). Not too difficult… although be carful if you attempt this yourself and solder and insulate all wires or you could be really warm when your car burns to the ground as you’re driving it.
Here is the crude wiring diagram I put together:
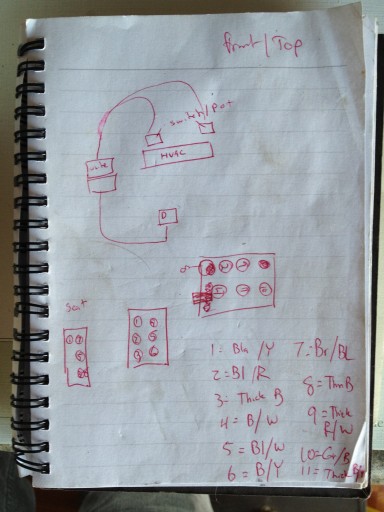
Again, please do your own research when attempting something like this. There may be slight differences in years/models that could create disastrous results.

Homemade belly pan/skid plate
Many people/mechanics leave these off the car as they are a “pain” to uninstall every time. I won’t go into my rant about how many mechanics really don’t care about your car and just go for time/money. I digress, Audi installed these for a reason: To protect engine components and significantly better aerodynamics. They never would have spent the money on adding and developing these if they were not necessary. That being said I did not want to pay $400+ dollars for one.. so I developed my own for < $20. Simply cutting out a cardboard piece and guess and checking my solution until it worked. Then using that template on a large ABS plastic 1/8″ piece. The results were sufficient:

Audi A4 Steering wheel
Very easy swap and gives the A6 a smaller feel. A few torx bolts and a 32mm coller nut and the old wheel is off – reverse the procedure for the new wheel and your driving a smaller car. It also helps to pull the servotronic relay (steering wheel assist) so it does not feel like you are driving a Crown Vic.

Red tops and Blue tops
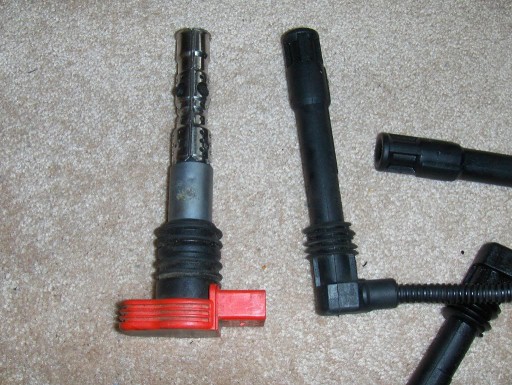
When I sent out my injectors to get cleaned I wanted to know the flowrates involved. So I started doing some digging on the part numbers. It seems most 2.8 Audi/VW engines had “Blue top” injectors. Although there was a bulletin posted in 2000 or so that stated the 2.8s were getting significant carbon deposits and were impacting drivability. The solution was to increase the tempature of the thermostat and get a better atomization injector (the “red top”) – you can see the difference in atomization nozzles below:
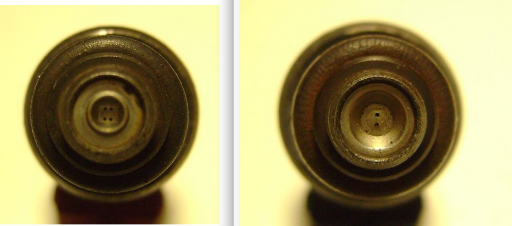
Gas mileage increases significantly with the updated design. Obviously better atomized fuel burns more completely. So if you have a 2.8 look at your injector color. I was finally able to test them properly after I fixed the glaring idle issue outlined in the timing belt post below (I was initially bummed that my idle did not clear up after installation of new cleaned updated injectors).
Audi Timing belt tools
I have had some some odd ECU faults show up over the small tenure of this Avant. Given the electrical system when I purchased this I thought there may be some lingering gremlins. Although a few errors like misfires on Bank 1 (Cylinders 1,2,3) have been coming up consistently. Now, with with the falling temperature outside the car was not reaching operating temperature. A usual suspect of the thermostat. Luckily, on the Audi/VW 2.8 30v engine it is almost inside the engine and you must pull off the front end, the serpentine belt, and the timing belt! For a $15 part. Frustrated with poor MPGs I pulled the front end apart to investigate:

Then quickly noticed that the cam plates were not lining up:

Thus the car was obviously out of time as well… I was all in now. The jokers before obviously did not use the correct tools. Oddly enough they used all original Audi parts for the job. Very odd combination. I looked for the Audi tools but they wanted quite a bit of money (for a relatively simple part.. So I thought I would try my hand at the CNC mill to make my own for ~$5
Quick solid-works design with actual dimensions:

Wooden mockup to check above dimensions before tooling:

In the CNC:

With the help of the newly created tools I timed the 30v 2.8 correctly for the first time in many years. (My QuattroWorld post). It rewarded me with an incredibly smooth idle, better power-band, and far better MPGs. I tested it by immediately (yes a day later) going on a 2000+ mile road trip to Colorado and back, Bilford did well for having 230K miles on him:
Our arrival into Fort Collins downtown:

Our trip up to Breckenridge:

There was only one small incident not timing belt related, the main fuel line into the rail leaked a bit. But mainly because the temp up at Breck was -30F. Tighened it up and I was on my way. Although did replace the fitting upon return.
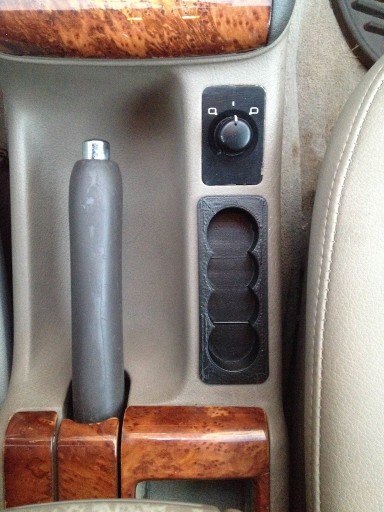
Change tray
If you are to this point of my post maybe you own a C5? Do you find your cup holder broken in the center console? (if you do indeed have a C5 chances are it is…) We whipped up a quick change tray in lieu of this expensive and rarely use cup-holder (there is one above the radio for the die-hard big gulp fans). If you have access to a RepRap, this design will soon be up on thingiverse.
>
Sport Seats – some assembly required
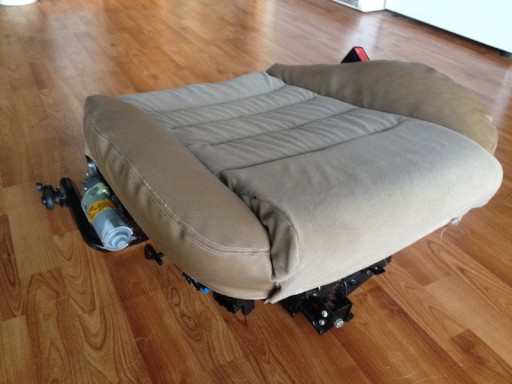
Well I picked up some sport seats for Bilford – they were local and for the entire set: $30 (front and rear) – but not in the best of shape of course. As with many things of this nature I saw potential.
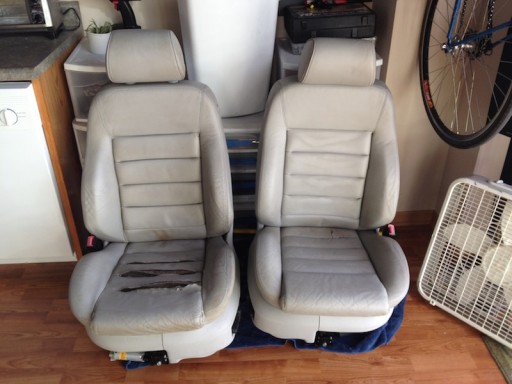
Something had to be done with that awful drivers seat. I measured the resistance in the heating circuit and there were some irregularities. So I took it apart to see what it is made of – and if the heating error would jump out:
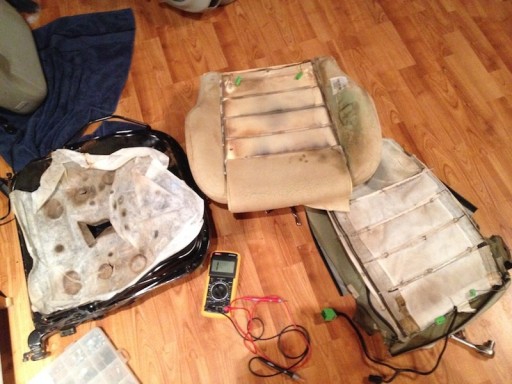
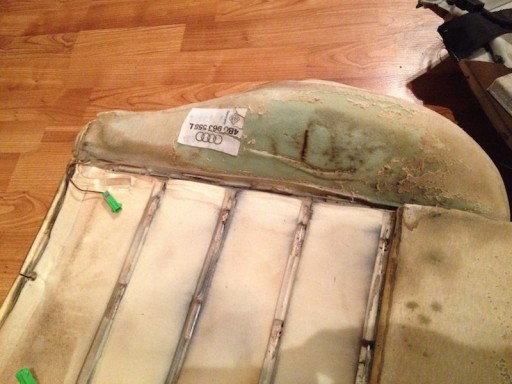
What do you know. There is some burn marks. I can just bypass the side bolster.. should be good. But man, there is a lot going on with a seat. Hog clips, foam repair, angles on the fabric.. I looked at reupholstering shops and Audi: it would be >$700 to redo JUST the bottom seat. I could probably make one.. I mean I did sew a new seat for my motorcycle. How hard could it be? Maybe do a Alcantara insert.. do some brown tones on the main parts. It would look really nice.
Well.. after hours of work, templating, planning, and painstakingly sewing.. I got 30% of what I wanted.
Some progress:

Since Bilford is not a beauty queen I left it with this single cushion (but hey, no rips anymore). I swapped the passenger side bottom to the driver for reliable heat, and it was in overall better shape (just patched the single rip). But, the passenger seat I made is actually the most comfortable seat in the car. I may swap it over to the driver again, after the heat is tested more thoroughly (bypassed side bolster). At least it was another fun project, with more experience logged. I have almost touched every aspect of the car – and it works better than most C5s on the road. I guess that says something.